In android there is lots of personal data that can be accessed by any unauthorized apps that were installed on the device. This is just because your Android data is openly saved in your file explorer that is not encrypted or protected by encryption method, so, even normal app can also hijack your data very easily as the media access permissions are granted when you click on accept button while installing the apps. And this may be endangering the private data that you might not want to share with anyone. So here we have a cool way that will help you to make your data private by disallowing the apps to access your media files without your permission. So have a look on complete guide discussed below to proceed.
How To Protect Your Private Data From Android Apps
The method is quite simple and just need a rooted android device that will allow the Xposed installer to run on the device. And after having the Xposed installer you will be using an Xposed module to disallow the apps to have access to your personal or say private data. For this follow the guide below.
Steps To Protect Your Private Data From Android Apps:
Step 1. First of all, you need a rooted android as Xposed installer can only be installed on a rooted android, so Root your android to proceed for having superuser access on your android.
Step 2. After rooting your Android device you have to install the Xposed installer on your android and thats quite lengthy process and for that, you can proceed with our Guide to Install Xposed Installer On Android.
Step 3. Now after having an Xposed framework on your Android the only thing you need is the Xposed module that is DonkeyGuard – Security Management the app that will allow you to manage the media access for apps installed on your device.
Step 4. Now install the app on your device and after that, you need to activate the module in the Xposed installer. Now you need to reboot your device to make the module work perfectly on your device.
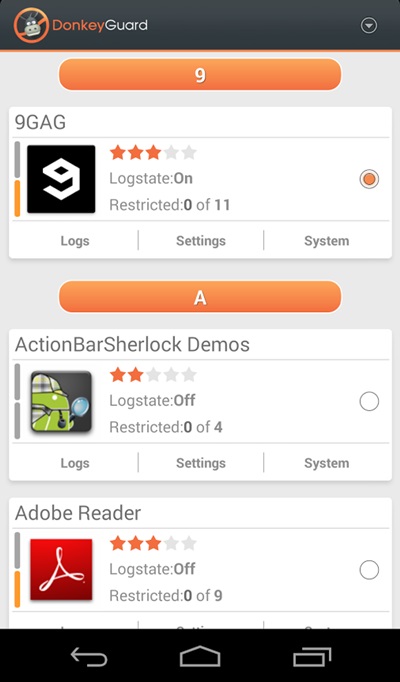
Step 5. Now launch the app and you will see all the apps that are currently installed on your device.
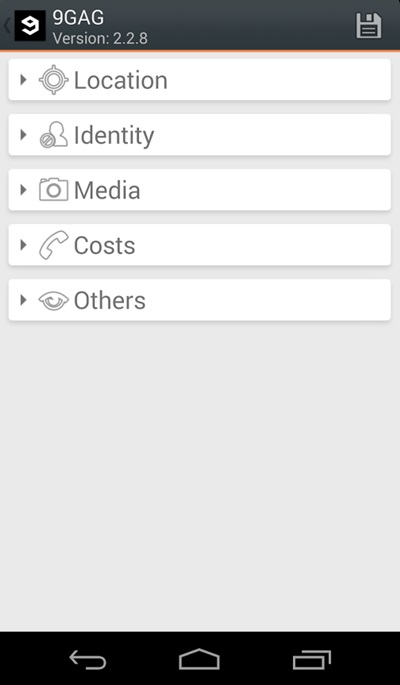
Step 6. Now edit the media permission for the apps that you don't want to have access to your media with private data.
That's it, you are done! now the app will disallow the media access to that apps.
Manually Checking App Permission
Well, our Android operating system offers a nice feature in which we can manage a single app's permission. However, you need to have Android 6.0 Marshmallow or a newer version to get the option.
Step 1. First of all, open Settings and then tap on 'Apps'.
Manually Checking App Permission
Step 2. Now you will see the list of apps that are currently installed on your Android smartphone. Now you need to select the app, and then you will see 'Permissions.'
Manually Checking App Permission
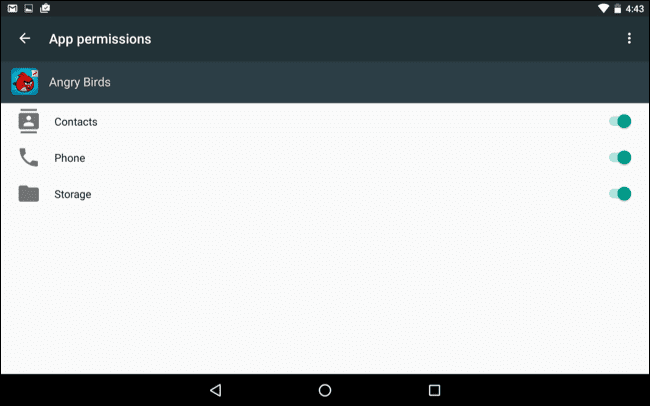
Step 3. Now it will open a new window, which will show you all permissions that you have granted to the app like Camera access, contacts, Location, microphone, etc. You can revoke any permissions as per your wish.
Manually Checking App Permission
Well, the same thing you need to perform if you feel that you have installed some suspicious app on your Android. By this way, you can protect your private data from Android apps.
Install your auhtoken: ./ngrok authtoken <YOUR_AUTHTOKEN>
Legal disclaimer: Usage of EvilOffice for attacking targets without prior mutual consent is illegal. It's the end user's responsibility to obey all applicable local, state and federal laws. Developers assume no liability and are not responsible for any misuse or damage caused by this program
I decided to cleanup my RF testing harness and release it as a tool named RFCrack
Mostly because it has been pain to set up use-case scenarios from scratch for every device I am testing. Rather then release a tool no one knows how to use. The below video will be a quick but comprehensive tutorial to get you started If you've been following the blogs, this will greatly simplify your testing, in the following ways:
RFCrack handles all of your data conversions.
It allows you to capture, replay and save payloads for use anytime
It will handle rolling code bypass attacks on your devices.
You can jam frequencies and fuzz specific values
It will also allow you to scan specific frequencies in discovery mode or incrementally probe them
RFCrack will hopefully have keyless entry & engine bypass support in the near future
This is the first release, everything works as intended but there will be plenty of updates as I continue to do research and find reasons to add features needed for testing. I am still making changes and making it more flexible with modifiable values and restructuring code. If you have any legitimate use case scenarios or need a specific value to be modifiable, hit me up and I will do my best to update between research, if its a legitimate use case.
Not all of the attacks in the tool have been covered in the RF hacking blog series and a few more are in research mode, as such, not yet added to the tool but will probably be covered in a full length online class on Hacking with RF which includes all targets and equipment. Send an email to info(at)cclabs.io if your interested.
Walkthrough Training Video:
Until Next time:
Cheers, and enjoy the tool for your personal use testing devices, feedback and bug reports are appreciated. I have another RF blog coming out shortly based on my friends research into hacking garages/gates and creating keyfobs. I will post when its ready.
macSubstrate is a platform tool for interprocess code injection on macOS, with the similar function to Cydia Substrate on iOS. Using macSubstrate, you can inject your plugins (.bundle or .framework) into a mac app (including sandboxed apps) to tweak it in the runtime.
All you need is to get or create plugins for your target app.
No trouble with modification and codesign for the original target app.
No more work after the target app is updated.
Super easy to install or uninstall a plugin.
Loading plugins automatically whenever the target app is relaunched.
Providing a GUI app to make injection much easier.
System Integrity Protection is a new security policy that applies to every running process, including privileged code and code that runs out of the sandbox. The policy extends additional protections to components on disk and at run-time, only allowing system binaries to be modified by the system installer and software updates. Code injection and runtime attachments to system binaries are no longer permitted.
Usage
download macSubstrate.app, put into /Applications and launch it.
grant authorization if needed.
install a plugin by importing or dragging into macSubstrate.
launch the target app. step 3 and step 4 can be switched Once a plugin is installed by macSubstrate, it will take effect immediately. But if you want it to work whenever the target app is relaunched or macOS is restarted, you need to keep macSubstrate running and allow it to automatically launch at login.
uninstall a plugin when you do not need it anymore.
Plugin macSubstrate supports plugins of .bundle or .framework, so you just need to create a valid .bundle or .framework file. The most important thing is to add a key macSubstratePlugin into the info.plist, with the dictionary value:
Key
Value
TargetAppBundleID
the target app's CFBundleIdentifier, this tells macSubstrate which app to inject.
Description
brief description of the plugin
AuthorName
author name of the plugin
AuthorEmail
author email of the plugin
Please check the demo plugins demo.bundle and demo.framework for details. Xcode Templates macSubstrate also provides Xcode Templates to help you create plugins conveniently:
Launch Xcode, and there will be 2 new plugin templates for you.
Security
SIP is a new security policy on macOS, which will help to keep you away from potential security risk. Disable it means you will lose the protection from SIP.
If you install a plugin from a developer, you should be responsible for the security of the plugin. If you do not trust it, please do not install it. macSubstrate will help to verify the code signature of a plugin, and I suggest you to scan it using VirusTotal. Anyway, macSubstrate is just a tool, and it is your choice to decide what plugin to install.
Ethical hacking is identifying weakness in computer system and/or computer networks and coming with countermeasures that protect the weakness. Ethical hackers must abide by the following rules- 1-Get written permission from the owner of the computer system and/or computer network before hacking. 2-Protect the privacy of the organisation been hacked etc. Ethical Hacking and Ethical Hacker are terms used to describe hacking performed by a company or individual to help identity potential threats on a computer or network.
An Ethical Hacker attempts to byepass system security and search for any weak point that could be exploited by Malicious Hackers.
Kali Linux has been the most advanced penetration testing machine introduced yet. It has the most valuable tools used for every sort of hacking. To take advantage of Kali Linux hacking tools, you have to switch your OS to Kali Linux. You can either install Kali Linux as your default OS or just install as a virtual machine within the same OS. You can learn more about how to install Kali Linux Virtualbox. Today in this tutorial, I am just going to share a very simple Kali Linux tutorial on how to capture screenshot in Kali Linux. It's very simple and newbie friendly.
SO, HOW TO CAPTURE SCREENSHOT IN KALI LINUX? – KALI LINUX TUTORIAL
There are two ways to capture a screenshot in Kali Linux. One is the ultimate easy one and the second one is a bit complex but it's also not so complicated. So, don't worry about anything.
INSTRUCTIONS TO FOLLOW
In a first way, you can take a screenshot in a similar way as you take in Windows OS by simply clicking the PrntScr button on the keyboard. As you hit that button, a screenshot will be saved in the Pictures folder of your Kali Linux. The major problem with it, it only captures the full screen. We have no control over it to capture a specific window or region.
The second way is to take a screenshot using the command. For that, open up a terminal in the Kali Linux and type apt-get install ImageMagick.
Once the command is completed and ImageMagick is installed. We have two options to take a screenshot with it. One is to capture full screen and second is to capture a specific window.
To capture full screen, type import -window root Pictures/AnyNameOfTheImage.png in the terminal. It will take a full screenshot and will save it to the Pictures directory by the name you specify. Make sure to type .png at the end of the file name.
To take a screenshot of a specific window or region, type import Pictures/AnyNameOfTheImage.png in the terminal and hit Enter, it will turn the cursor to a selection tool. You just click the mouse button and select the area you want to capture. As you will leave the mouse key, screenshot will be saved in the Pictures folder.
That's all how you can capture screenshot in Kali Linux. This is a very simple and beginner-friendly Kali Linux tutorial to help out all the newbies how they can use this features in need. Hope it will be useful for you.
Bypassing Blockchain Authorization via Unsecured Functions
Note: Since the first part of this series I have also uploaded some further videos on remediation of reentrancy and dealing with compiler versions when working with this hacking blockchain series.Head to the console cowboys YouTube account to check those out.Haha as mentioned before I always forget to post blogs when I get excited making videos and just move on to my next project… So make sure to subscribe to the YouTube if you are waiting for any continuation of a video series.. It may show up there way before here.
Note 2: You WILL run into issues when dealing with Ethereum hacking, and you will have to google them as versions and functionality changes often... Be cognizant of versions used hopefully you will not run into to many hard to fix issues.
In the second part of this lab series we are going to take a look at privacy issues on the blockchain which can result in a vulnerably a traditional system maynot face. Since typically blockchain projects are open source and also sometimes viewable within blockchain explorers but traditional application business logic is not usually available to us. With traditional applications we might not find these issues due to lack of knowledge of internal functionality or inability to read private values on a remote server side script.After we review some issues we are going to exploit an authorization issues by writing web3.js code to directly bypass vertical authorization restrictions.
Blockchain projects are usually open source projects which allow you to browse their code and see what's going on under the hood.This is fantastic for a lot of reasons but a developer can run into trouble with this if bad business logic decisions are deployed to the immutable blockchain.In the first part of this series I mentioned that all uploaded code on the blockchain is immutable. Meaning that if you find a vulnerability it cannot be patched. So let's think about things that can go wrong..
A few things that can go wrong:
Randomization functions that use values we can predict if we know the algorithm
Hard-coded values such as passwords and private variables you can't change.
Publicly called functions which offer hidden functionality
Race conditions based on how requirements are calculated
Since this will be rather technical, require some setup and a lot of moving parts we will follow this blog via the video series below posting videos for relevant sections with a brief description of each.I posted these a little bit ago but have not gotten a chance to post the blog associated with it.Also note this series is turning into a full lab based blockchain exploitation course so keep a lookout for that.
In this first video you will see how data about your project is readily available on the blockchain in multiple formats for example:
ABI data that allows you to interact with methods.
Actual application code.
Byte code and assembly code.
Contract addresses and other data.
Lab Video Part 1: Blockchain OSINT:
Once you have the data you need to interact with a contract on the blockchain via some OSINT how do you actually interface with it? That's the question we are going to answer in this second video. We will take the ABI contract array and use it to interact with methods on the blockchain via Web3.js and then show how this correlates to its usage in an HTML file
Lab Video Part 2: Connecting to a Smart Contract:
Time to Exploit an Application:
Exploit lab time, I created an vulnerable application you can use to follow along in the next video. Lab files can be downloaded from the same location as the last blog located below. Grab the AuthorizationLab.zip file:
Ok so you can see what's running on the blockchain, you can connect to it, now what?Now we need to find a vulnerability and show how to exploit it. Since we are talking about privacy in this blog and using it to bypass issues. Lets take a look at a simple authorization bypass we can exploit by viewing an authorization coding error and taking advantage of it to bypass restrictions set in the Smart Contract.You will also learn how to setup a local blockchain for testing purposes and you can download a hackable application to follow along with the exercises in the video..
Lab Video Part 3: Finding and hacking a Smart Contract Authorization Issue:
Summary:
In this part of the series you learned a lot, you learned how to transfer your OSINT skills to the blockchain. Leverage the information found to connect to that Smart Contract. You also learned how to interact with methods and search for issues that you can exploit. Finally you used your browsers developer console as a means to attack the blockchain application for privilege escalation.